Here’s a fun way to upcycle a picnic basket you’ve scored at a vintage shop or on Marketplace! Give your picnic basket new life by sewing a custom fabric liner for it. Making your own DIY fitted wicker picnic basket liner pattern isn’t that hard at all, and you can even customize it with pockets if you’d like.
If you’ve sewn my rectangle basket liner before, this is similar, but with some specific changes (and extra goodies/perks!) that adapt it perfectly to a picnic basket you want to upcycle. Most picnic baskets usually have handles on the long sides instead of the ends, so that’s one change we will make. If your basket has a lid, this will fit perfectly underneath the lid and around the hinged handles on the sides.
This is such a fun grannycore, grandma hobby thing to make, and perfect timing since International Picnic Day is June 18.
Materials Needed to Sew a Custom Picnic Basket Liner
The good news about making your own picnic basket liner is that the materials required are really minimal. You’ll need some basic sewing tools, along with these few things:
This post may contain links that pay me a small commission if you make a purchase, at no extra cost to you. Thank you for supporting my free tutorials!
- Cotton or canvas fabric in a cute pattern
- Thread in a matching or coordinating color
You can use a wide variety of fabrics, but I really enjoyed working with a sturdier fabric. The one I used wasn’t exactly canvas, and if you choose something super heavy you might find you have trouble getting the layers through your machine. Since this liner is removable, don’t fret too much. Just pick something with a cute design that feels heavier than a hanky.
Picnic Basket Liner Sewing Tutorial
1. Measure Your Picnic Basket
With a flexible measuring tape, measure the inside dimensions of the bottom of the picnic basket (length and width).
And if your picnic basket flares out at all (and most do), the outside top measurement will be bigger than the inside bottom. You’ll need to measure the width and length of the basket at the top too. Those two measurements will be different. That difference is what gives the side panels their trapezoid shape.
Next, place your measuring tape inside the picnic basket to find the height of its sides.
You also need to measure any width of the basket “walls,” and decide how far over the edge you want your fabric to extend.
Use my printable worksheet to write your measurements and calculate the size of your fabric pieces. This will become a reusable pattern so you can make new picnic basket liners throughout the summer!
2. Calculate the Picnic Basket Fabric Cut Sizes (How to Cut Your Fabric)
Use my downloadable worksheet to calculate your fabric cuts so your picnic basket liner fits perfectly.
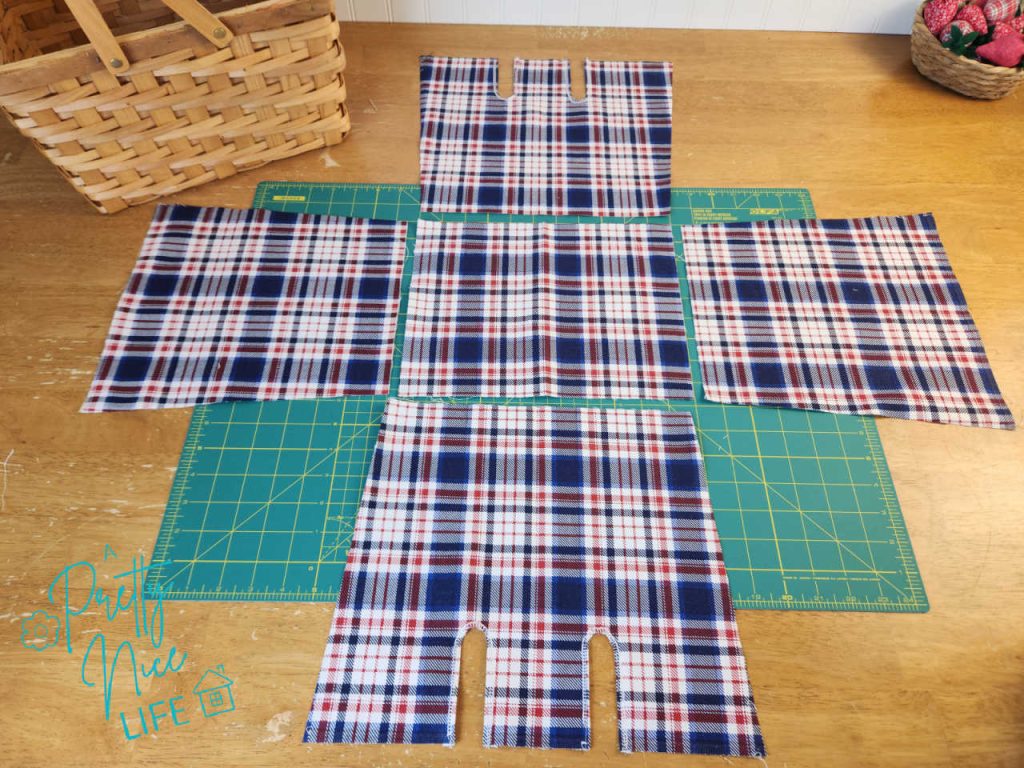
You will end up with five pieces of fabric (not counting the ties you’ll make later in this tutorial.) The bottom piece is cut to the exact inside bottom measurement with no seam allowance added. The side panels will be trapezoid shapes with seam allowances and extra height for a hem and overhang.
The Cut List:
- 1 Bottom Piece: Length by Width
- 2 Long Side Panels: Length by Height (plus calculated overages)
- 2 Short Side Panels: Width by Height (plus calculated overages)
- 4-8 strips of fabric, about 2″ wide, for the ties
How to Cut the Trapezoid Shape
Because most baskets flare out at the top, your side pieces won’t be simple rectangles. They’ll be trapezoids, wider at the top than at the bottom. When I first figured this out, how to actually cut that shape had me stumped. Then it clicked, and there’s no fancy math or pattern-drafting required.
Start by cutting a plain rectangle using the larger, outside-top measurement for the width, and your calculated height. Fold it in half so the width is cut in half too (the height stays the same).
At the bottom edge of the folded fabric, measure over half of your basket’s inside bottom measurement and make a mark. Angle a ruler from that mark up to the top corner of the folded fabric, and cut along the line.
Unfold it, and you’ve got your trapezoid: wide at the top, narrower at the bottom, exactly the shape a flared basket needs.
Repeat for all four side panels.
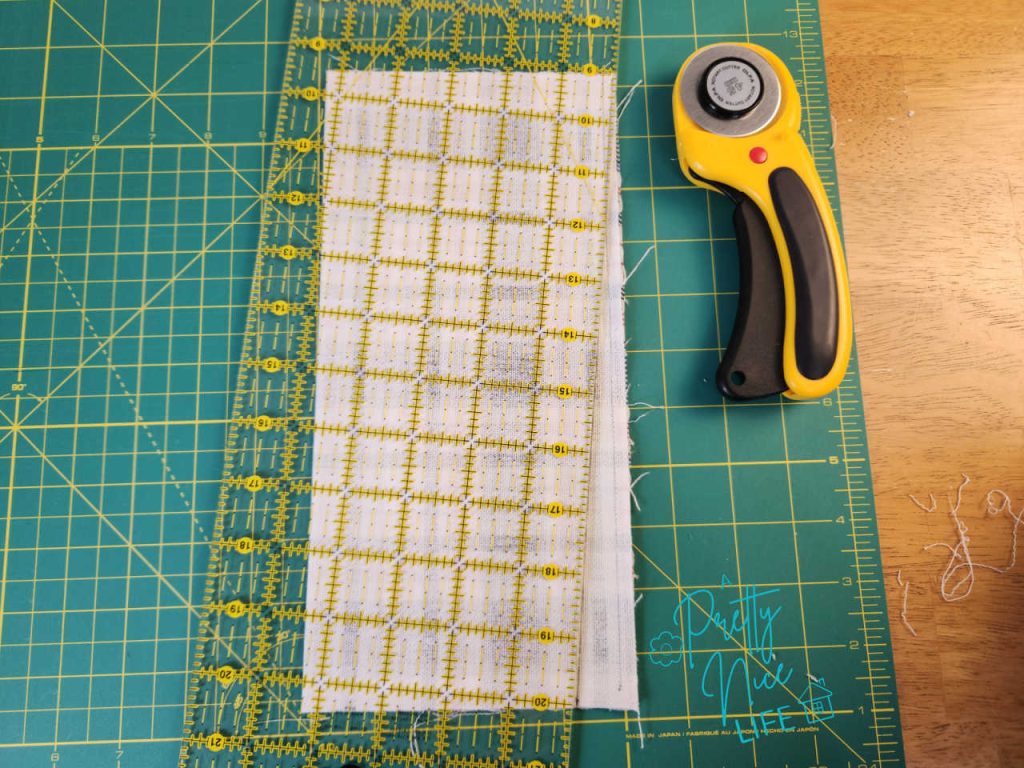
Cut and Sew Your Ties
You can make ties out of ribbon or from the same fabric as your picnic basket lining. To use the fabric, cut 2″ strips to whatever length you like. (I recommend making the strips at least 11″ long.) You’ll need two ties per handle hinge. A basket with one handle across the top has two hinges, so that’s four ties total. A basket with two handles, like mine, has four hinges, so that’s eight ties total.
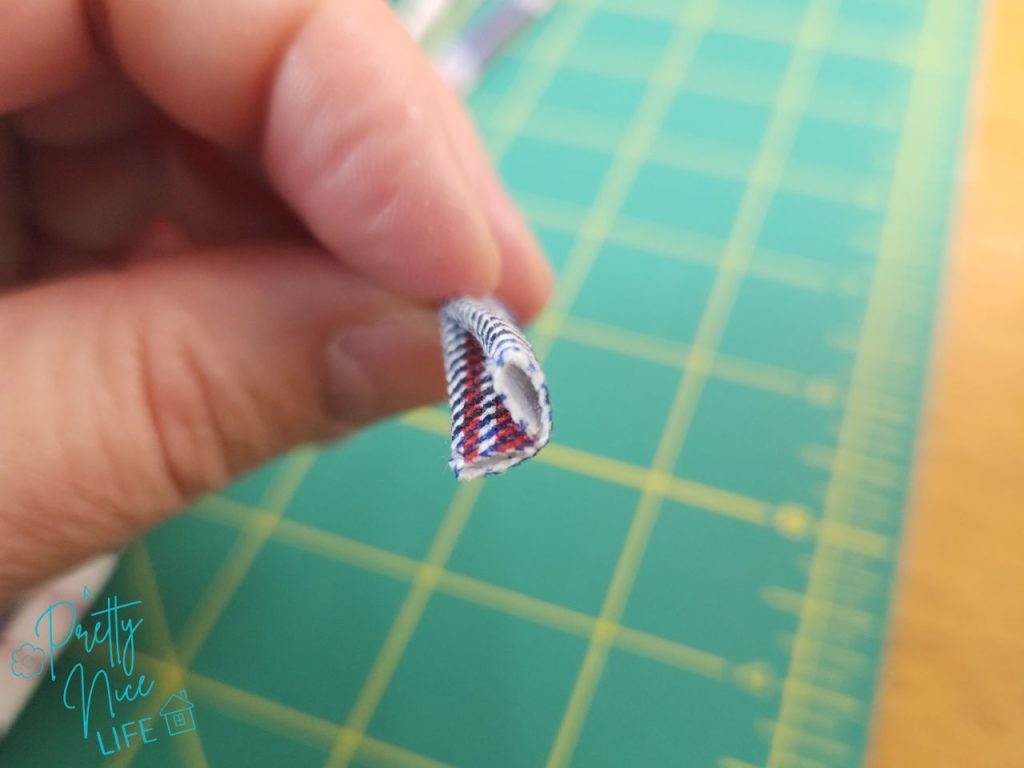
Fold each strip in half lengthwise, press, then open them back out. At one end, fold in a small hem to cover the raw edge. Press in place.
Using the pressed center line as a guide, fold each edge in to the center down the length of the strip. I like to press mine with the iron so they stay in place. Then fold each tie in half lengthwise.
Sew down the length of each strip to hold the tie together. Set aside.
Cut and Finish the Handle Slits
Hold the panel up against your basket and mark where each handle hinge sits.
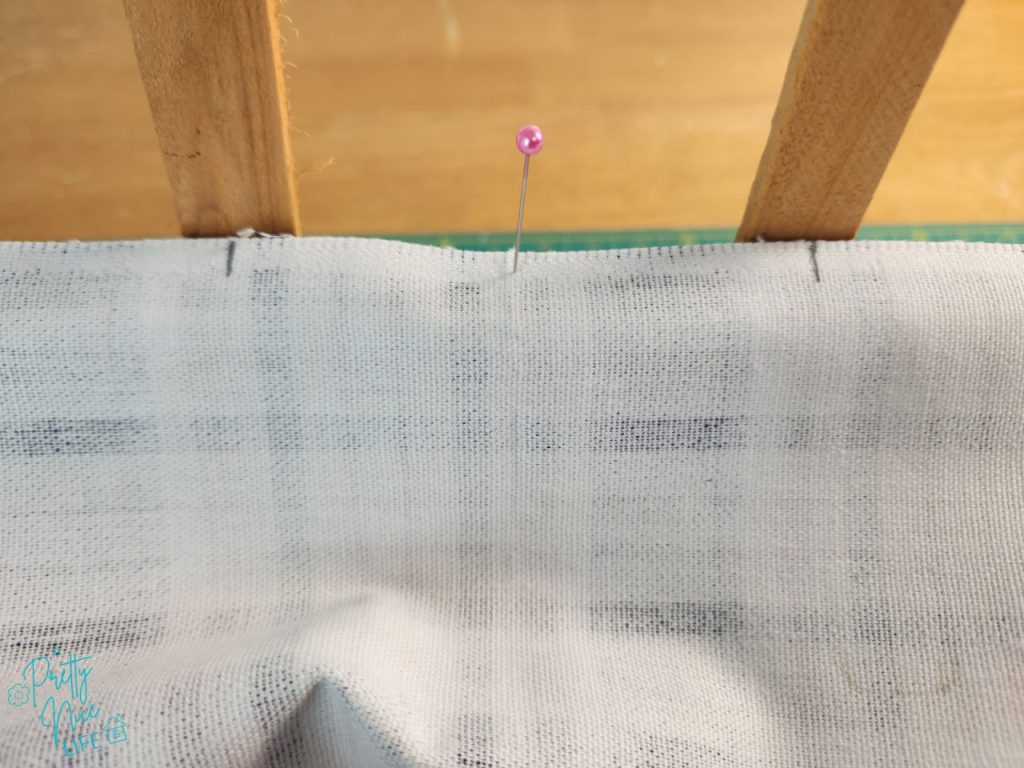
Draw a line where you will cut your opening. Make it at least as long as your overhang plus hem.
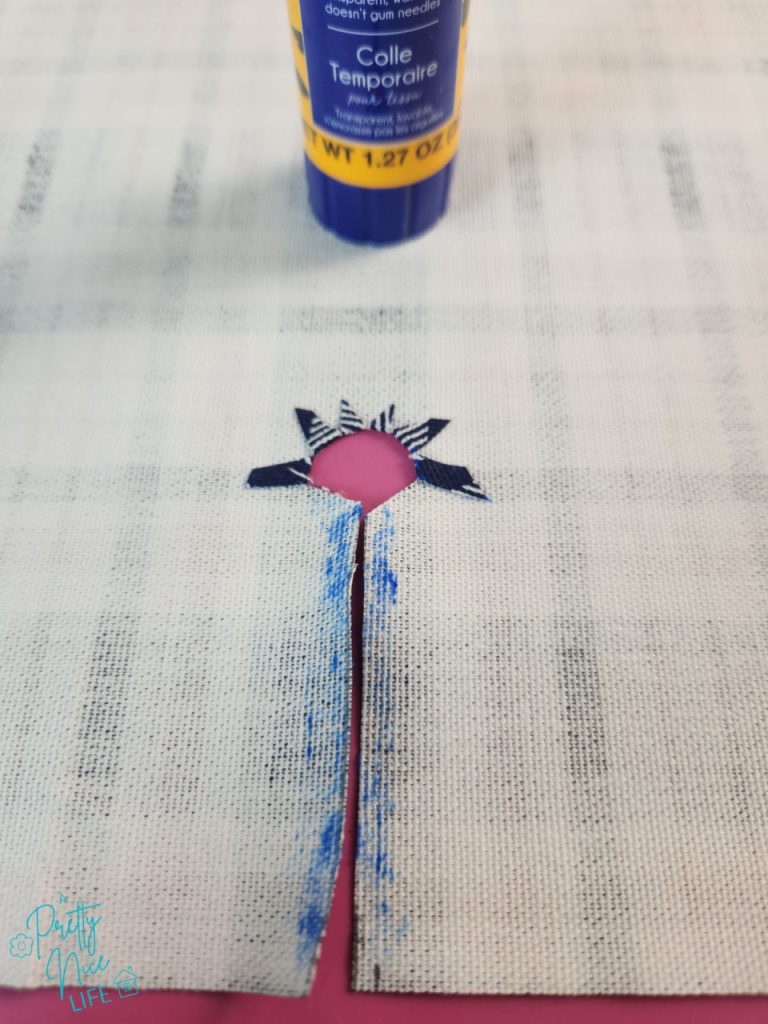
At the top of each slit, draw a small curve (this is where the hinge hardware will actually sit) and clip up to it with a few short cuts, fanned out like spokes. The clips let the curve fold under smoothly instead of bunching into points.
Fold the raw edge to the wrong side along the curve and the straight sides of the slit. I used 505 temporary fabric adhesive to hold the folded edge in place before stitching. Use just a little, and let it dry for a minute before you sew. I didn’t, and my thread bunched up.
Stitch around the opening to catch the turned-under fabric. The closer you stitch to the edge, the more likely you are to catch all of it. If you want, you can use a zig-zag stitch to make sure you keep all the little pieces of fabric in place.
Finish both slits on each long panel before moving on to assembly.
Sew the Side Pieces
This is the easy part! Fire up the ol’ sewing machine. You’re going to start by sewing the side pieces together. Lay out your pieces, alternating short side, long side, short side, long side. If your fabric has a directional pattern, make sure you have the print going the way you want it on each piece.
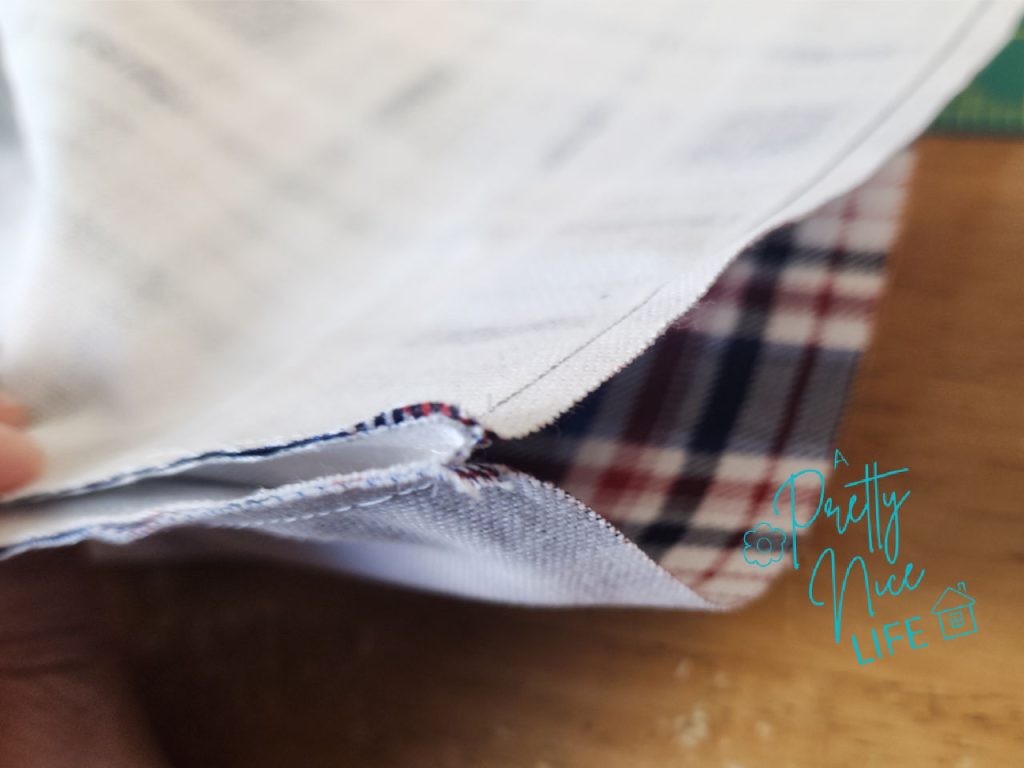
Place one long side right sides together with one short side and sew a 1/4″ seam allowance from the top to the bottom, stopping 1/4″ from the bottom edge.
Open the two pieces you’ve just sewn together. Lay the next short side face down on the long side, matching the unsewn edges. (Take a minute to ensure that the fabric is oriented properly.) Now sew your next 1/4″ seam, stopping 1/4″ from the bottom edge. Repeat with the final long side of the fabric, then sew the last two raw edges together to close the loop.
Sew the Bottom to the Sides
Pin your bottom piece to the ring of side panels, right sides together, matching up the corners as you go.
Sew around the entire bottom using the same ¼” seam allowance, pivoting at each corner. This is exactly why you left those ¼” gaps at the bottom of your side seams: they let the fabric pivot cleanly around each corner instead of fighting against stitching that’s already there.
Once it’s sewn, set the liner into your basket and check the fit. Make any adjustments you need before hemming.
Insert the Ties and Hem the Top
Before you hem the top, place a tie on each side of every handle slit, parallel with the top raw edge and pointing toward the handle opening. Be sure the hemmed edge of the tie is the end that will be visible. Sew the ties to the liner with either a zig-zag or straight stitch.
Once all the ties are in place, fold the raw edge under 1/2″, then fold another 1/2″ to hide the raw edge. Stitch along the inner fold all the way around.
Optional: Add a Pocket!
This is an optional step I haven’t done yet for my picnic basket liner, but you can add pockets. Cut two equal size fabric pieces, a little larger than you would like your pocket to be. Place them right sides together, sewing around the perimeter with a 1/4″ seam allowance, and leave about two inches at the bottom unsewn. Use the unsewn gap to turn the piece right side out. Place the pocket where you want it on the right side of the fabric picnic basket lining and top stitch around the bottom and both sides. You can be very specific about the size or kind of wing it! (If you know exactly what you want to put in the pocket, measure and give yourself a little wiggle room so you know the item fits.)
And that’s it. Your picnic basket liner is ready for picnics, Fourth of July cookouts, or just sitting pretty on your counter until summer plans come together. If you make one, I’d love to see it. Tag me on Instagram or Pinterest, or leave a comment below and tell me how it went.